This Homemade Banana Pudding is a Southern classic turned baddie, layered with creamy scratch-made banana pudding, ripe bananas, and those nostalgic Nilla wafers, all crowned with a cloud of whipped cream. But wait, there’s more! We’re adding cream cheese, giving this dessert a rich, tangy depth that takes the banana pudding recipe from basic to snatched.
Need Cookout Menu Ideas?
Ok, so boom! If you’re looking to host a cookout that’s filled to the brim with flavor, I’ve got you covered! This Homemade Banana Pudding With Vanilla Wafers and Cream Cheese is the perfect sweet ending to a savory feast. Here’s a cookout-themed menu that pairs perfectly with this dessert:
- Entree: Grilled Hot Links with Chow Chow – These spicy sausages are a cookout must-have, and when topped with tangy chow chow, they’re a force to be reckoned with. They’re giving us heat, flavor, and texture in one hand held package.
- Side: Brown Sugar Baked Beans – These beans are slow-cooked in a rich, smoky brown sugar sauce, making them a side dish that’s hitting on all levels.
- Salad: Grilled Caesar Salad – This ain’t your average Caesar, y’all! Grilled romaine lettuce, creamy dressing, and a sprinkle of parmesan make this salad the truth!
- Drink: Jungle Juice (Party Punch) – This right here is the life of the party. It’s sweet, it’s fruity, and it’s got a kick that’ll keep the cookout vibes going.
The Proof Is In The Pudding: Instant Vs Homemade
I’ve mentioned my sister Marsaidees on the blog before. She’s an amazing cook and the queen of banana pudding at our family functions. She typically whips up her version using a instant pudding, but with a twist. She adds cream cheese and a sprinkle of extra cinnamon, layers it with frozen whipped topping and let me tell you, it slaps!
But here’s the real tea: she uses banana pudding instead of vanilla pudding. It’s a game changer, y’all. It amps up the banana flavor in a way that’s just… chef’s kiss.
Taking a leaf out of her book, I decided to go full-on homemade. And sheesh, did it pay off! The first time I made the banana pudding over the stove, I almost ate the whole thing warm. It’s that good. But when you combine the homemade banana pudding with the vanilla wafers and homemade whipped cream, its next level. It’s creamier, it’s banana-ier, and it’s got that homemade touch that just can’t be beat. The might be the best banana pudding you’ll ever have, I’m that confident. So, if you’re ready to level up your banana pudding game, let’s dig in to this recipe.
What You’ll Need For This Recipe:
Homemade Banana Cream Pudding Mixture
- Fresh Bananas – We’ll use 6 of these. Remember to choose ripe but firm bananas. They provide the natural sweetness and unmistakable flavor that makes this pudding a hit.
- Large Egg Yolks – These are crucial for the pudding’s rich and creamy texture. Save the whites for a healthy omelette or a meringue!
- Cornstarch – This is our thickening agent. It helps the pudding achieve that perfect, spoonable consistency. If you don’t have cornstarch, you can substitute with an equal amount of arrowroot powder or double the amount of all-purpose flour.
- Evaporated Milk – This gives the pudding a creamy and rich flavor. You can substitute with regular milk or half-and-half if needed, but the pudding may be less rich.
- Granulated Sugar – This sweetens the pudding. Feel free to adjust the amount to your liking. You can also use coconut sugar for a more caramel-like flavor.
- Kosher Salt – A little bit of this enhances the sweet flavors. Don’t skip it!
- Cream Cheese – Cut into small cubes, this adds a tangy richness to the pudding. If you’re not a fan, you can leave it out, but I promise it’s a game changer!
- Pure Vanilla Extract – This adds a depth of flavor. You can also scrape a vanilla bean if you’re feeling fancy.
- Unsalted Butter – This adds a bit of richness and helps the pudding achieve a velvety texture.
- Nilla Wafers – These add a delightful crunch and vanilla flavor. If you can’t find them, Chessman cookies or Biscoff cookies would work too. The Biscoff cookies add a lovely ginger flavor that’s perfect for the holiday season.
- Ground Cinnamon – A little bit of this goes a long way in adding warmth to the pudding. Plus, a sprinkle on top makes for a beautiful garnish.
Fresh Whipped Cream
- Heavy Whipping Cream – Make sure it’s cold to whip up into a fluffy cloud. You can’t substitute this one, it’s essential for whipped cream.
- Powdered Sugar – This sweetens the whipped cream. You can adjust the amount to your liking.
- Vanilla – This enhances the flavor of the whipped cream. Use pure extract for the best flavor.
- Salt – Just a pinch balances the sweetness and enhances the flavor.
How To Make Banana Pudding From Scratch
Here’s the quick rundown but more detailed instructions can be found below in the recipe card.
Storage & Reheating Recommendations
To Make Ahead
You can whip up this creamy dream up to 48 hours in advance. Just be aware that the earlier you make it, the higher the chances of your sliced bananas turning brown before you serve. To prevent this, make sure to keep those banana slices tucked under the pudding blanket to prevent them from turning brown. If you’re planning to serve it later, just add some fresh banana slices on top when it’s time to dig in.
To Store
Now, if you’ve got leftovers (which I doubt, ’cause this pudding is a hit!), you can store them in the fridge for up to 2 days. Just cover the dish with plastic wrap to keep it fresh and to stop it from picking up any fridge odors.
To Freeze
Hold up, if freeze banana pudding, let me stop you right there. Freezing this dessert is a no-go. The texture of the whipped topping, bananas, and cookies won’t be the same once thawed.
About Banana Pudding
Let’s take a moment to appreciate the star of the show – Banana Pudding. This dessert is a Southern belle, a staple at barbecues, cookouts, potlucks, and family get-togethers. It’s right up there with pound cake, peach cobblers, and sweet potato pie. But let’s be real, nothing quite hits the spot like banana pudding.
But where did banana pudding come from, you ask? Well, after the American Civil War, bananas became more accessible from the Caribbean and South America. This led to a banana pudding boom in the 1890s, with recipes popping up in newspapers, magazines, and cookbooks all over the country. Fast forward to just after World War II, and banana pudding had become nearly synonymous with the South. So there you have it, a little history lesson on our beloved banana pudding.
The Art of Layering:
Now, let’s get into the nitty-gritty of layering this deliciousness.
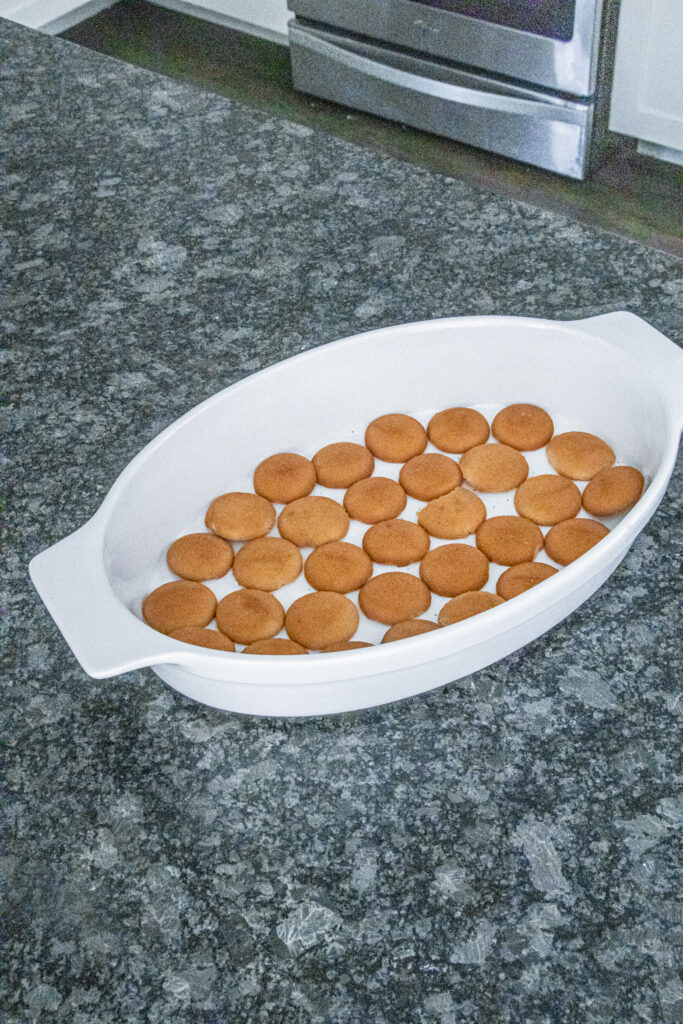

Layer 1 – Vanilla Wafers: Start by lining the bottom of your trifle dish with vanilla wafers. This will form the base of your dessert and give it a delightful crunch.
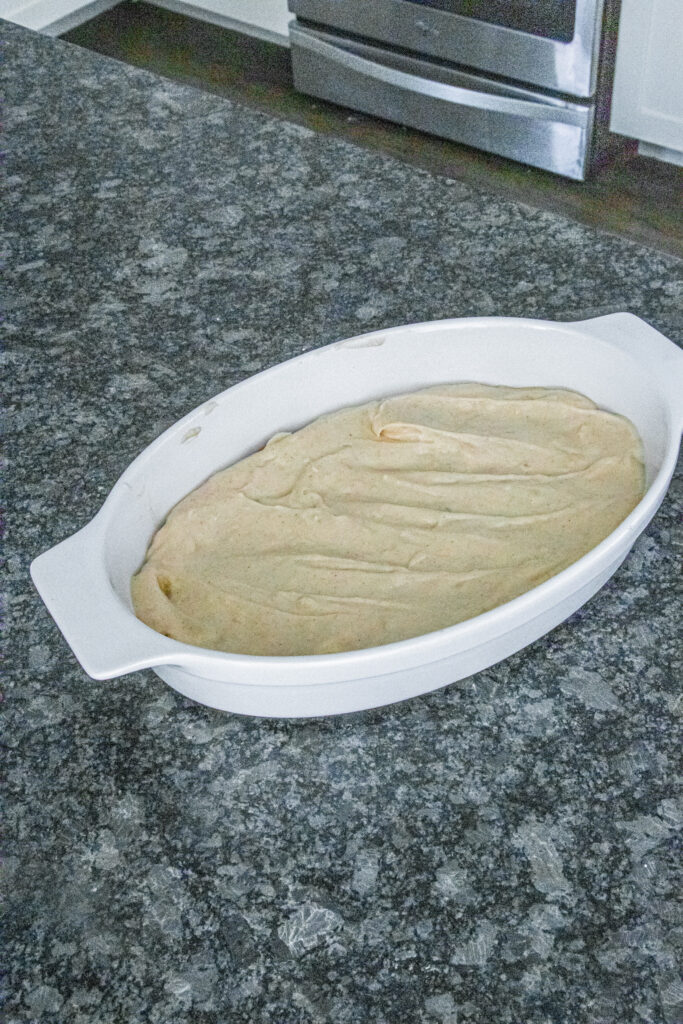
Layer 2 – Banana Pudding: Spoon half of your homemade pudding mixture on top of the wafers and spread it out evenly.
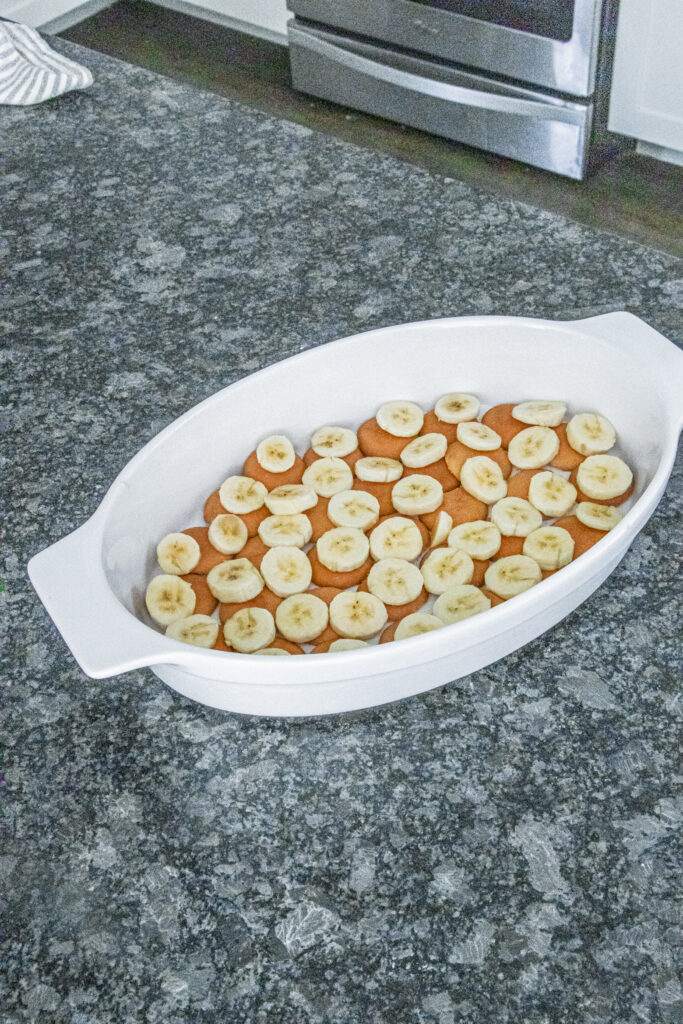
Layer 3 – Fresh Bananas: Next, layer on some fresh banana slices. T
Layer 4 – Whipped Topping: Spread this fluffy, light layer on top of the bananas.
Repeat Layers: You’re going to repeat those layers one more time – vanilla wafers, pudding, bananas, and remaining whipped topping. This repetition ensures that every bite is packed with all the flavors of this classic dessert.
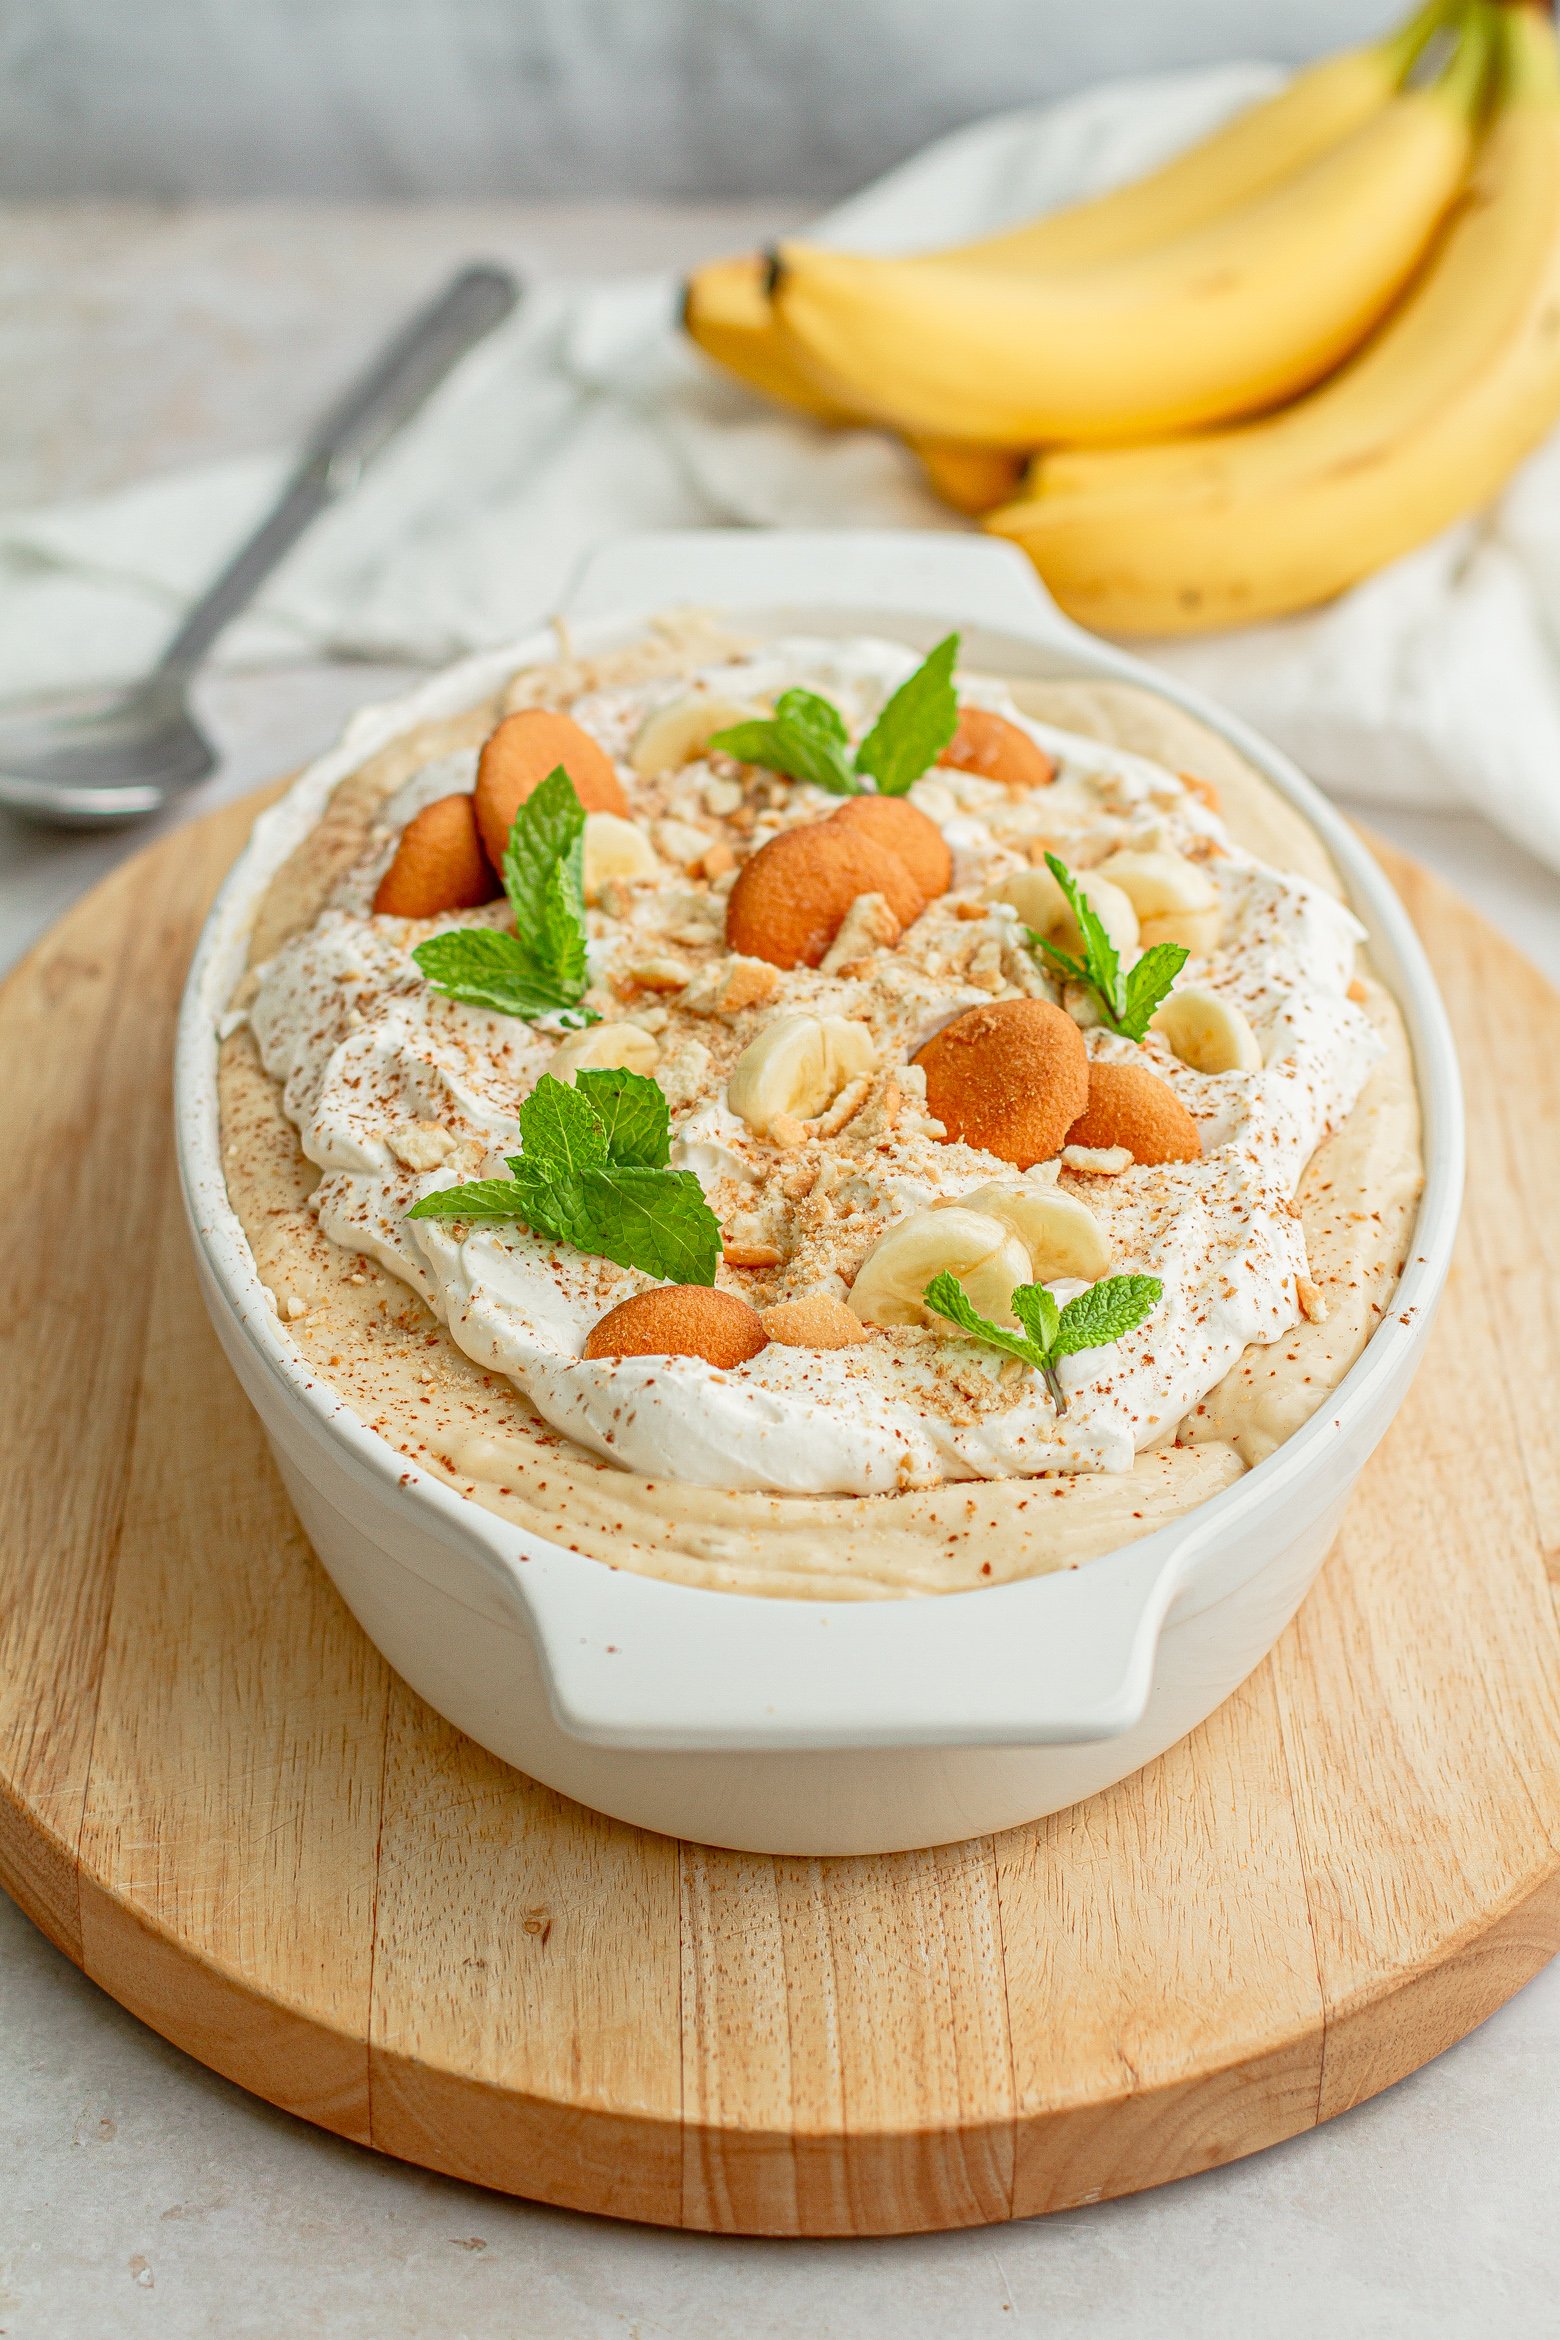
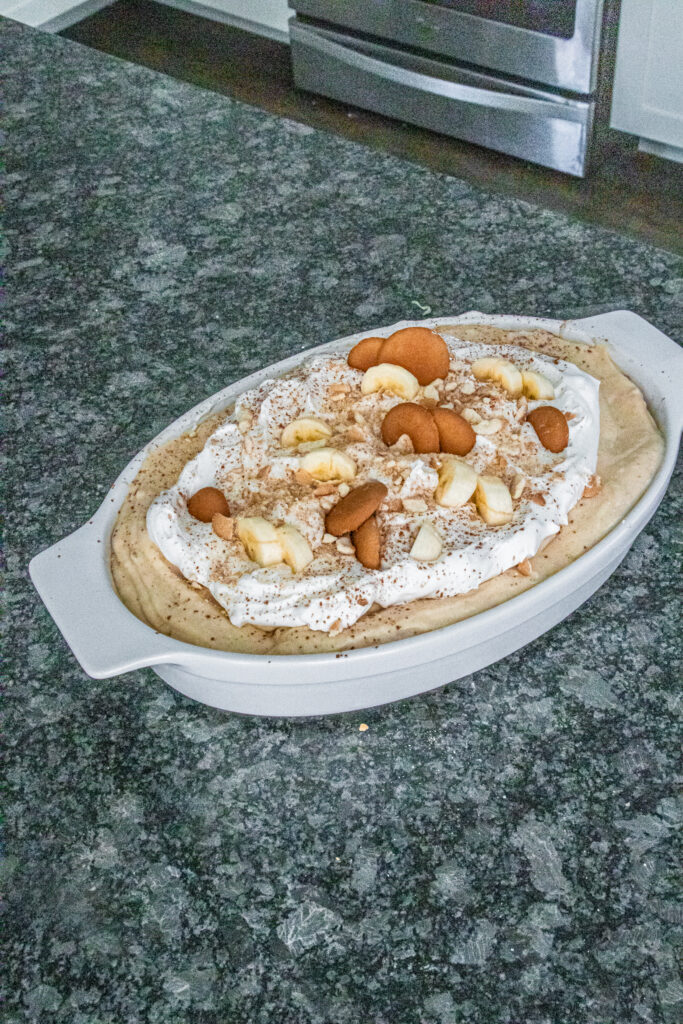
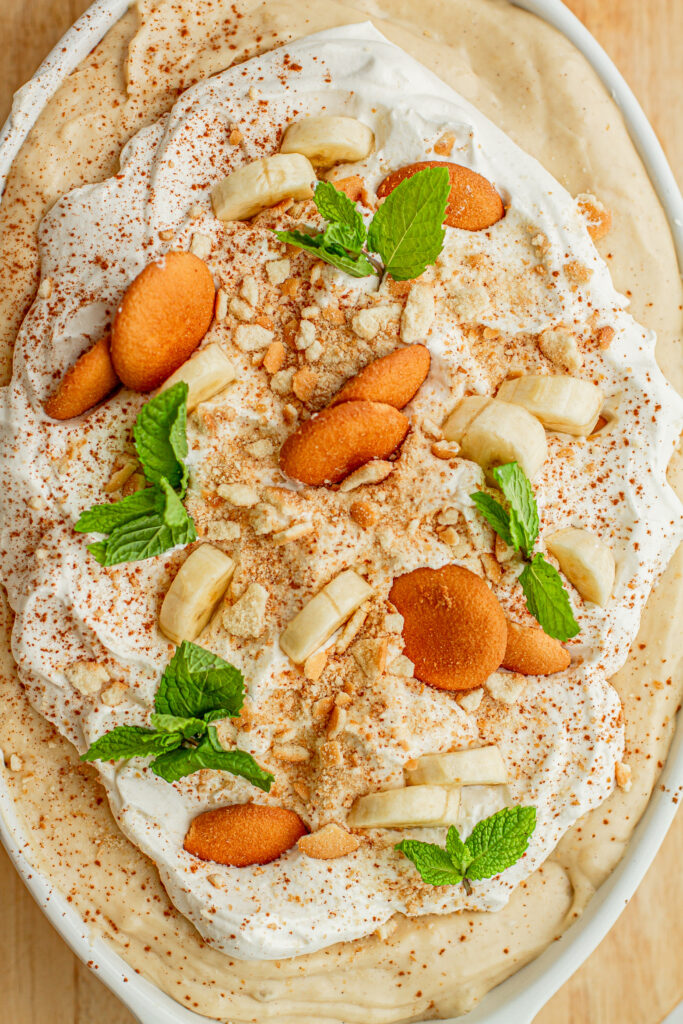
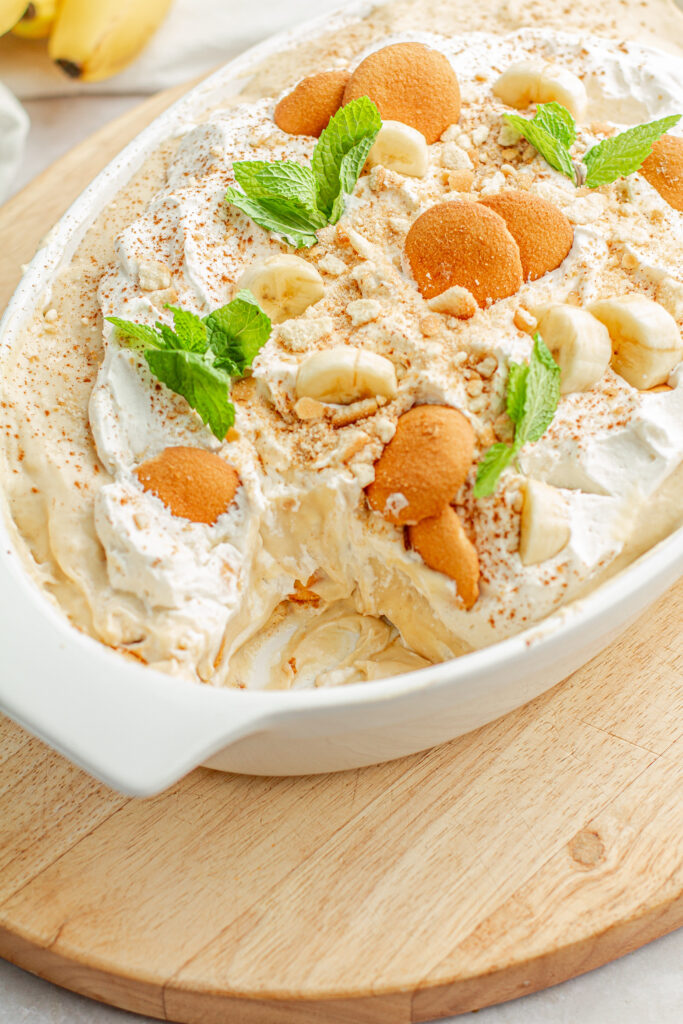
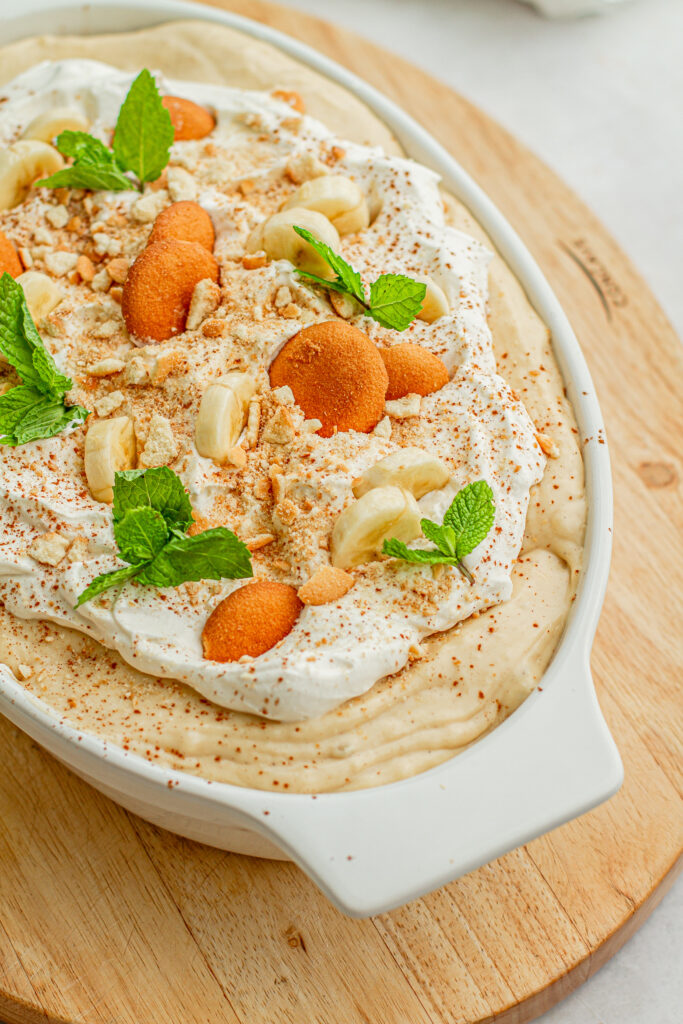
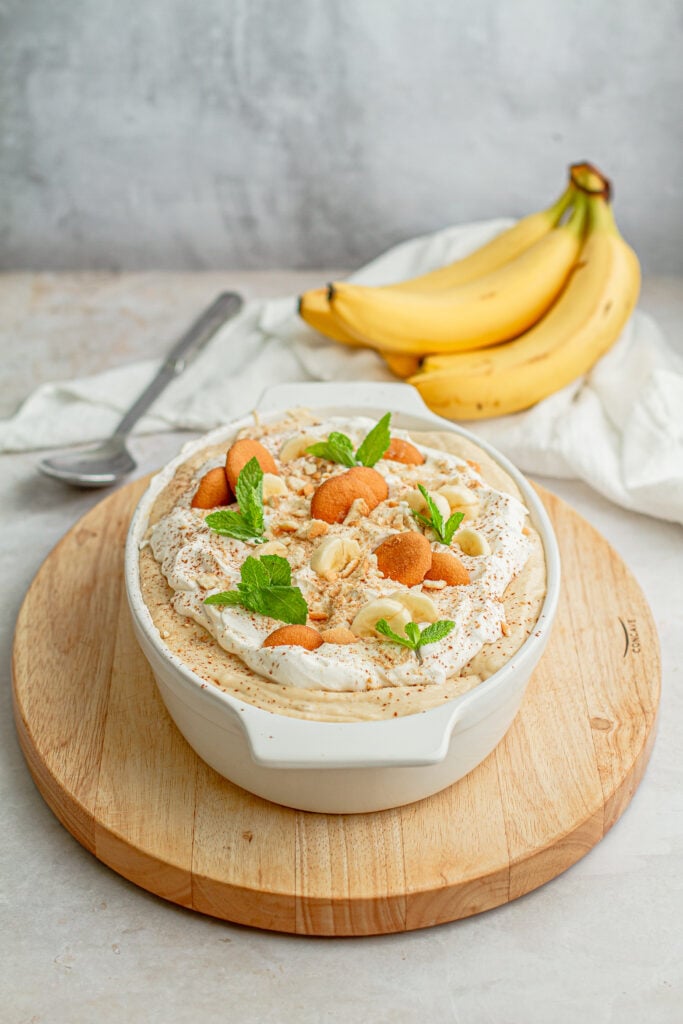
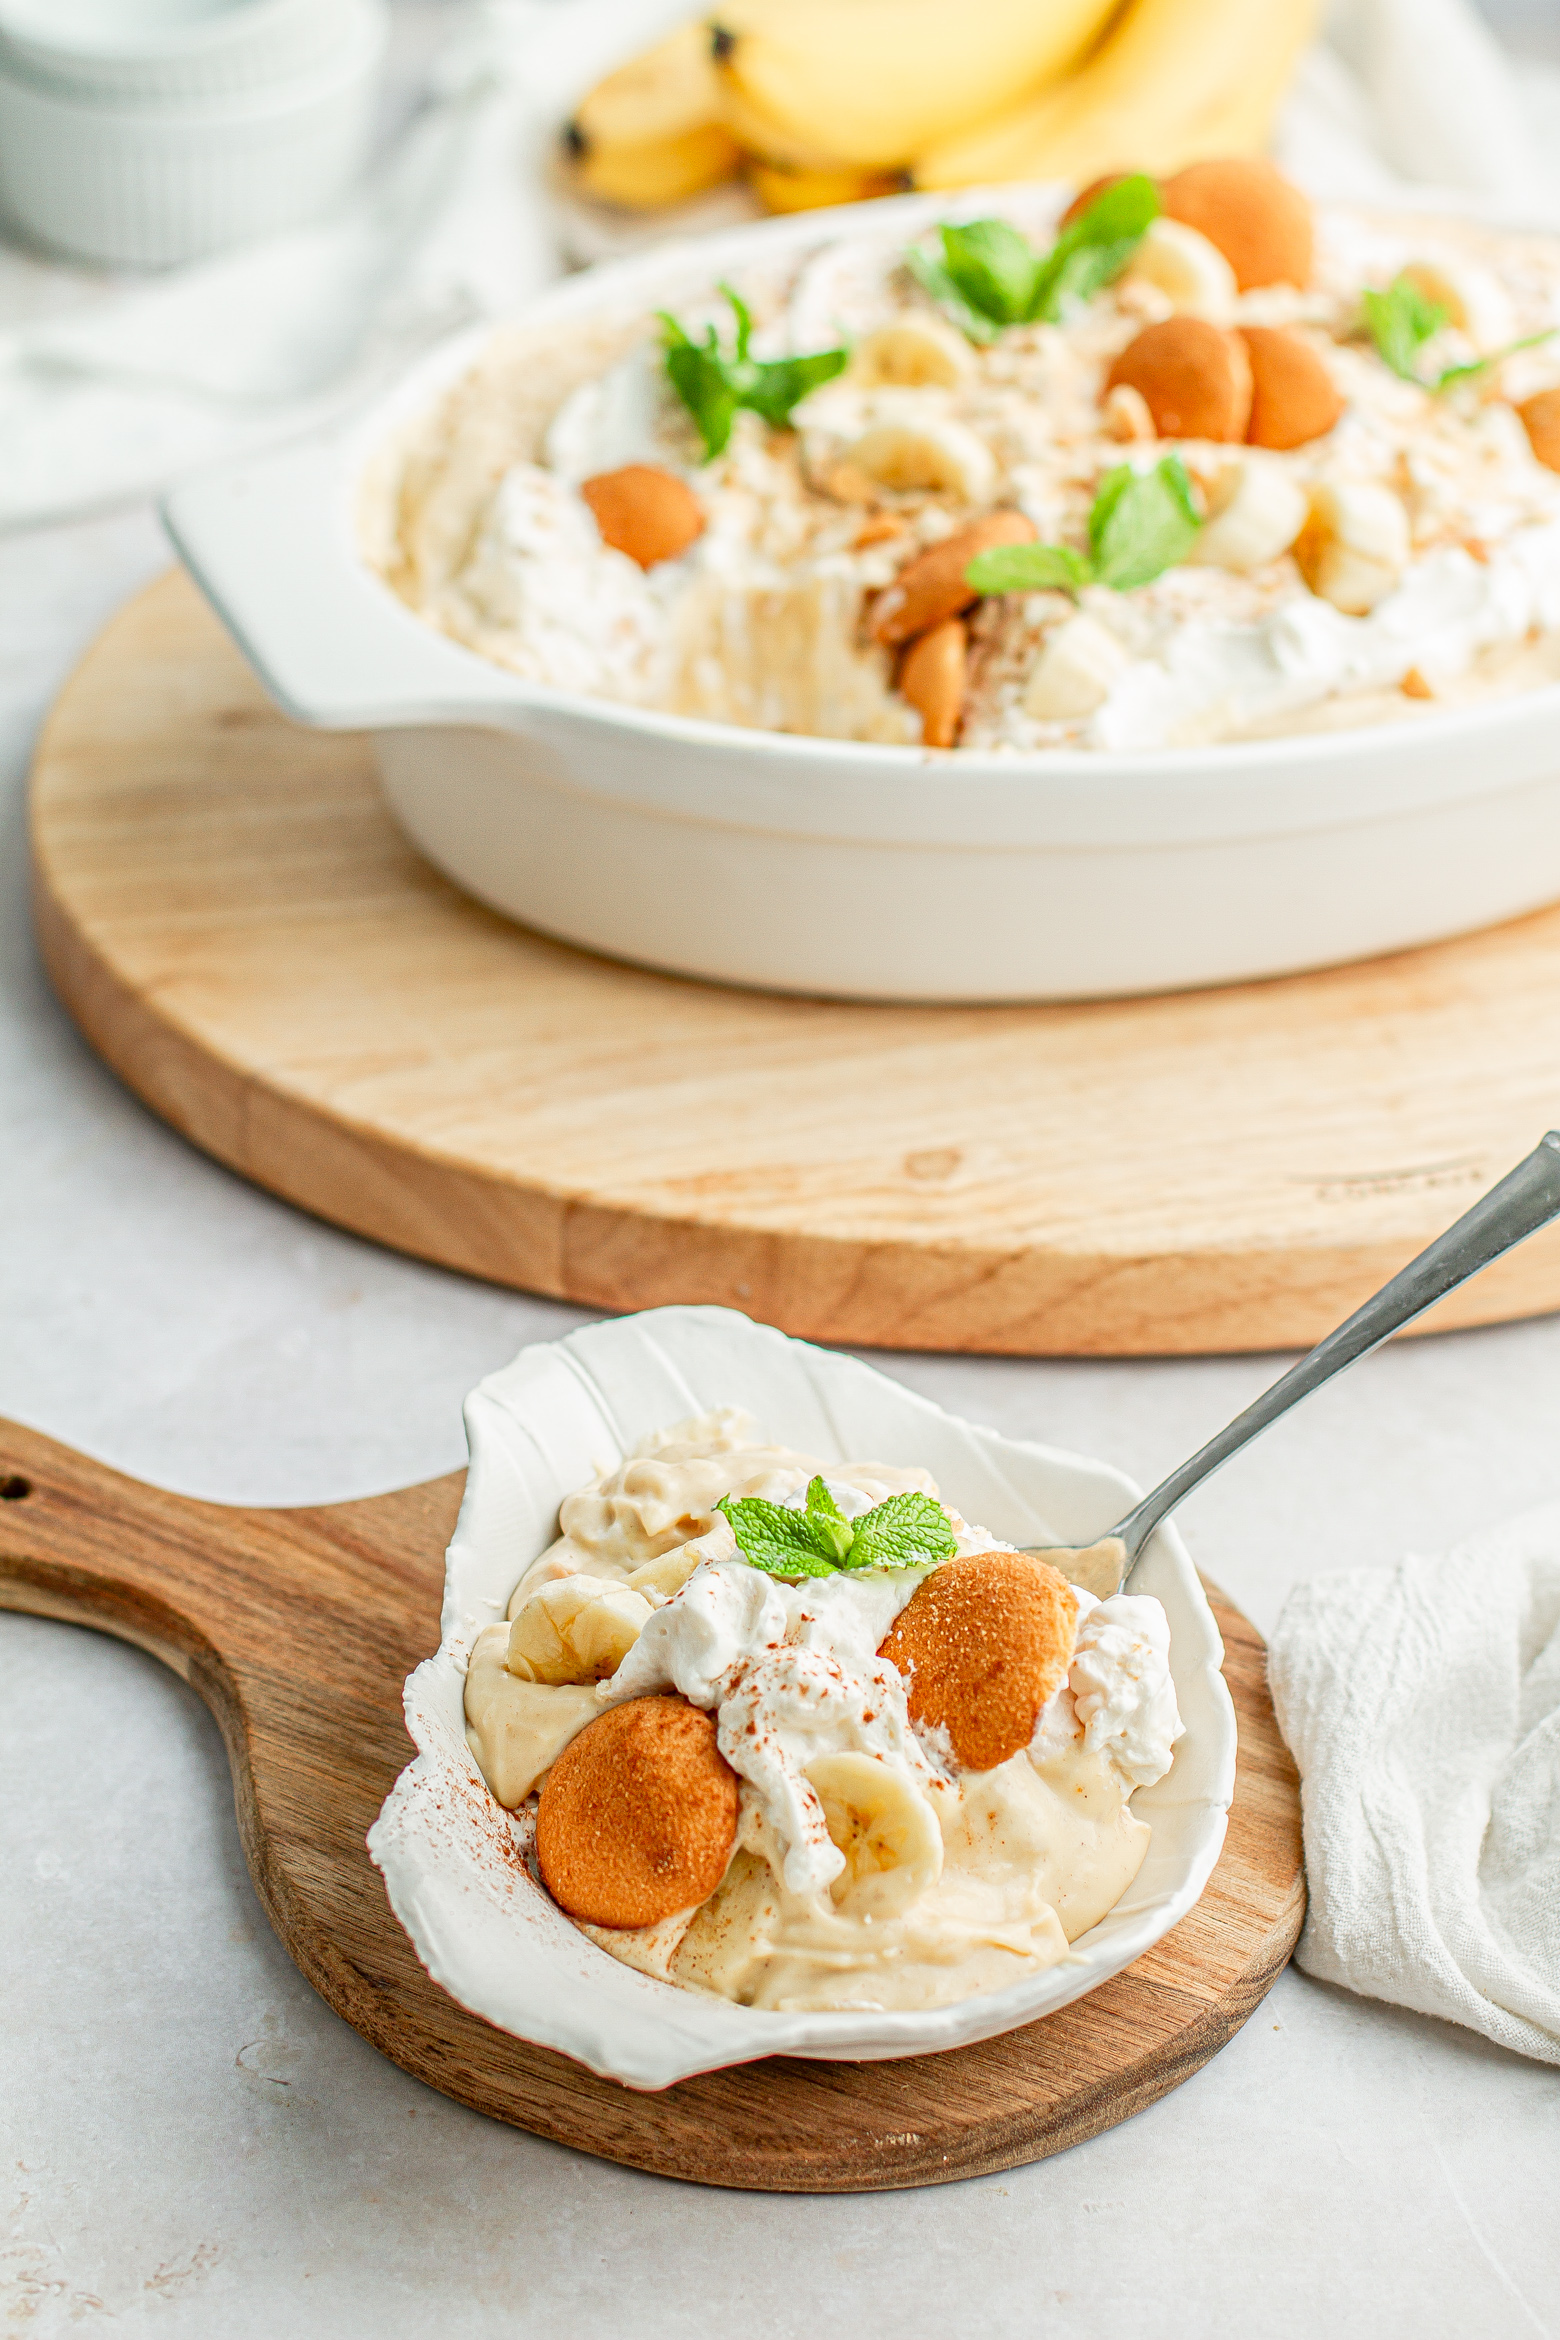
Final Touches: If you’re feeling fancy, you can top it off with some extra crushed wafers and banana slices. This not only looks great but also adds a final crunch and burst of banana flavor.
Thickening Your Pudding:
So, you’re wondering how to get that thick, creamy pudding consistency? Well, the secret is in the cornstarch. You’ve gotta bring your pudding mixture to a boil so that the liquid gets absorbed by the starch. This is what gives your pudding that thick, luscious texture that we all love.
How To Keep Bananas From Turning Brown in Banana Pudding:
Alright, let’s talk about the elephant in the room – those pesky bananas turning brown in your pudding. Now, if you’re whipping up this dessert just a few hours in advance, you ain’t got nothing to worry about. But if you’re like me and like to get a head start on things, you might want to take some extra steps to keep those bananas looking fresh and pretty.
Here’s the tea: you can treat your banana slices with a little citrus juice to prevent them from turning that unappealing brown color. We’re talking lemon juice or orange juice – but don’t go overboard, y’all. We’re making banana pudding, not lemon pudding. So, just lightly brush the juice onto the fruit or give them a quick spritz with a spray bottle. The key here is to use as little juice as possible.
And one more thing – hold off on garnishing the top of your banana pudding until the last minute. I like to add some extra banana slices or vanilla wafers on top just before I serve it. It keeps everything looking fresh and inviting. So there you have it, my secret to keeping those bananas in the pudding looking as good as they taste!
Meiko’s Pro Recipe Tips
- Banana Basics
Wafer Wisdom
- Use ripe bananas for the best flavor. Overripe bananas can be too mushy for this dessert.
- To prevent bananas from turning brown, lightly brush them with citrus juice, club soda or spritz with them with a spray bottle. Use as little juice as possible to avoid altering the flavor of the pudding. This will slow the process of oxidation preventing the banana slices from turning brown.
Chilling and Serving
- Nilla wafers are traditional and work great, but you can also use Chessman cookies, Golden Oreo Thins, graham crackers, shortbread cookies, biscoff cookies, or butter cookies for a different look and taste.
- For garnishing, add extra cookies and banana slices just before serving.
Extra Tips
- Allow the pudding to chill for at least 4 hours before serving. This gives the cookies time to soften and the layers to come together.
- You can chill the banana pudding for at least 1 hour before assembling to have an extra firm pudding that will be easier to layer. Trifle is all about the layers meaning it’s important that each layer remain visibly distinctive.
- Stir pudding constantly to prevent the bottom from scorching and to keep lumps from forming.
Add Some Flair: Variations & Customizations
Pudding Variations
- Change up the flavor by using chocolate, peanut butter, or butterscotch pudding instead of banana. Each one brings a unique twist to the classic banana pudding.
- Looking for a recipe that uses instant vanilla pudding mix? This Easy Banana Pudding Recipe my be calling your name.
Extra Layers
- For a more decadent dessert, double the amount of whipped cream and add extra layers over the banana pudding. This will give you a creamy, dreamy dessert that’s sure to impress.
Sweet Drizzles
- Drizzle caramel over the layers for a sweet, sticky addition that complements the flavors of the banana and vanilla.
More Banana Pudding Recipes
- If you’re a fan of this recipe, you might also enjoy my husband’s Vanilla Wafers Banana Pudding. It’s a classic take using vanilla pudding and sweetened condensed milk.
- For a grown-up version, try his Whisky Banana Pudding. It’s a boozy delight that’s sure to impress.
- And if you’re a chocolate lover, don’t miss his Chocolate Banana Pudding. It’s a rich, indulgent treat that’s perfect for any chocolate fanatic.
More Absolutely Delicious Southern Desserts
Frequently Asked Recipe Questions
How do I keep them banana slices from turning all brown-like?
Well, darlin’, you can spritz ’em with a lil’ bit of citric juice (think lemon, lime, or pineapple juice). Or, you can use something like Ball’s Fresh Fruit powder.
Why add cream cheese to banana pudding?
The bananas, smooth pudding, and crunchy wafers are all sweet in their own way. Cream cheese is rich and tangy, and it adds a lil’ richness without overpowering any of the other delicate flavors.
What can I use instead of them vanilla wafers in the banana pudding?
You can try Chessman cookies, Golden Oreo Thins, graham crackers, shortbread cookies, animal crackers, or butter cookies.
Can I use banana flavored instant pudding or vanilla instant pudding? First let me say that making homemade is not hard at all, but if you preference is to use the box mix instead, you can totally sub it in.
What bananas are best for banana pudding?
When picking bananas for this recipe, find ripe bananas with no brown or green spots. You’re lookin’ for bananas that look ready to eat that day!
How long does it take for homemade pudding to thicken?
About 10-12 minutes both on the stove and in the ice bath. It’ll thicken up even more as it cools for at least 4 hours in the fridge.
Do you eat banana pudding hot or cold?
Now, this is a matter of some debate. I have strong feelings about this. We definitely prefer to eat our banana pudding cold. But lots of folks like to eat their homemade banana pudding while its still warm, adding the meringue and toasting it right before serving.
Prep Your Tools & Ingredients
Here is a quick list of things to do before the recipe to ensure everything goes smoothly. This list may contain affiliate links which won’t change your price but will share some commission to help support this blog.
Gather Your Tools:
- Medium saucepan
- 9×13 baking dish or casserole dish
- Hand mixer or stand mixer
Recipe Prep
- Always read the recipe through at least 1 time before you start. It helps you move faster when you already know what step is coming next.
- Measure out all of your ingredients.
- Separate egg whites from the yolk.
- Take cream cheese out the fridge and cut into cubes. Leave out to get to room temperature.
- Make the homemade whipped cream and refrigerate
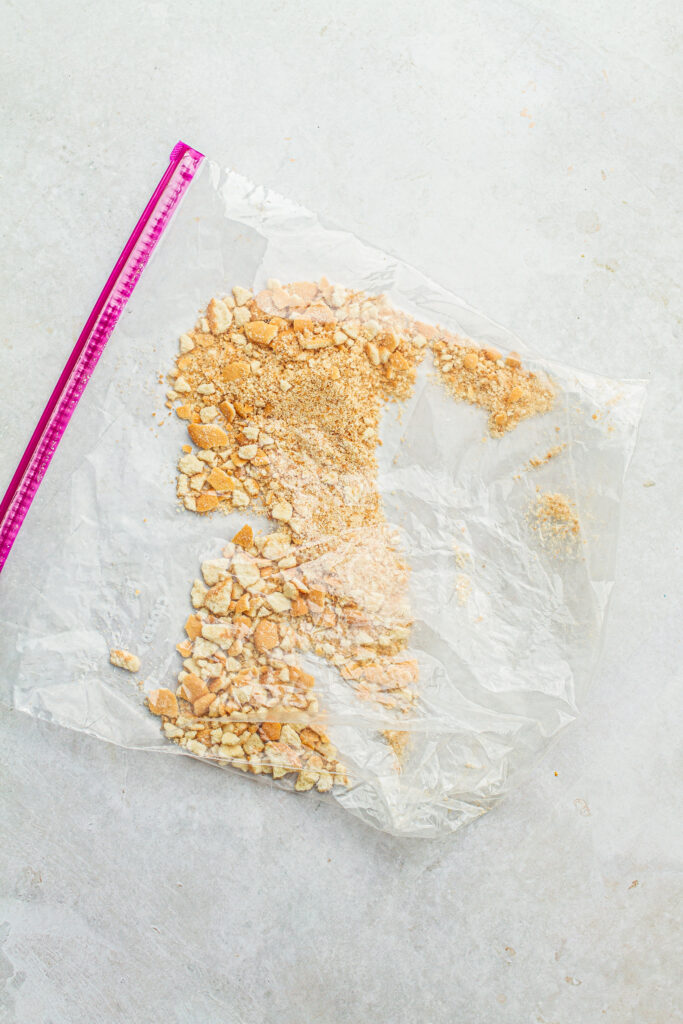
- Crumble approximately 10 your vanilla wafers for the final garnish.
Now It’s Your Turn!
Alright, babe, we’ve just gone through all the deets of this killer Homemade Banana Pudding With Vanilla Wafers and Cream Cheese recipe, and now it’s your turn to bring the magic. This isn’t just some basic dessert – it’s a legit flavor party with sweet bananas, lush homemade pudding, and those addictive vanilla wafers, all layered up and waiting for you in your fridge.
So, what are you waiting for? Get in that kitchen and when you do, don’t forget to rate the recipe and leave a comment below. Your feedback is like a double tap on my latest selfie. And hey, if you try this recipe at home, be sure to tag @meikoandthedish on your socials – I’m totally here for seeing your culinary masterpieces!
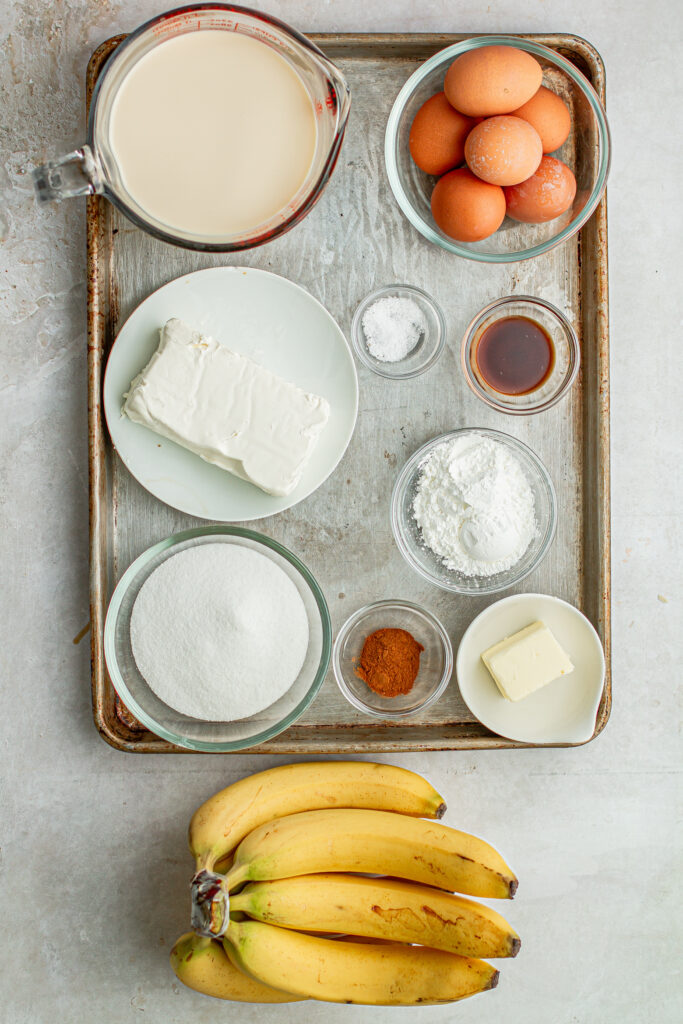
Ingredients
Homemade Banana Cream Pudding
- 6 bananas divided
- 6 large egg yolks
- 6 tablespoons cornstarch
- 3 cups evaporated milk divided
- ¾ cup granulated sugar
- ½ teaspoon kosher salt
- 8 oz cream cheese cut into small cubes
- 2 teaspoons pure vanilla extract
- 3 tablespoons unsalted butter
- 1 11 oz box of Nilla Wafers
- ¼ teaspoon ground cinnamon + additional for garnish
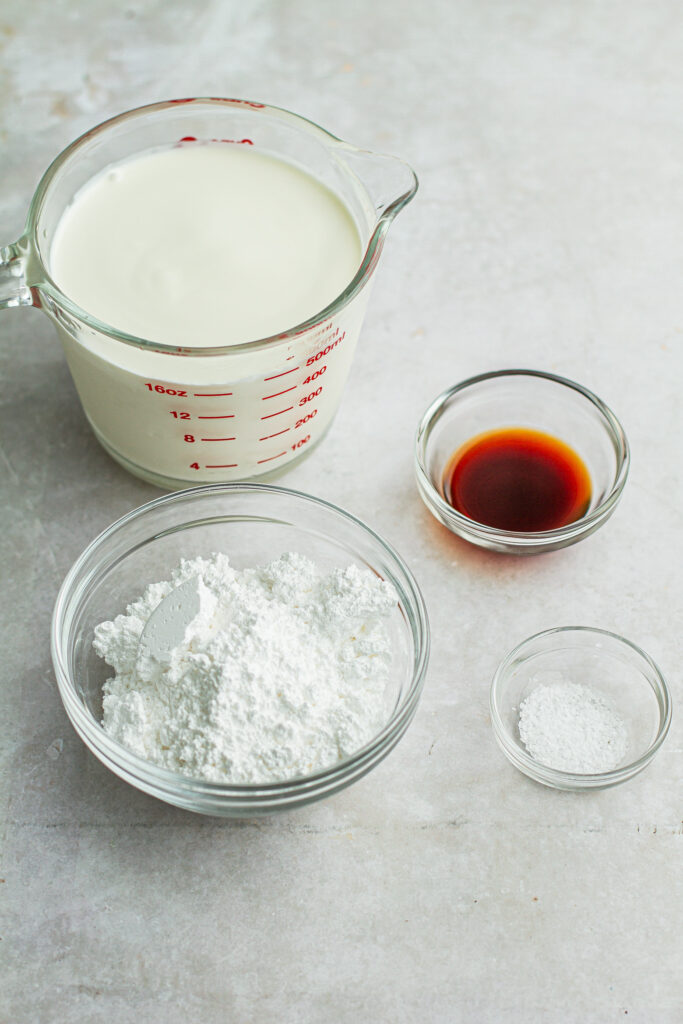
Fresh Whipped Cream
- 3 cup heavy cream cold
- 3/4 tablespoon powdered sugar
- 3 teaspoon vanilla
- ¼ teaspoon salt
Instructions
Ingredient Prep (Mashed Banana, Slurry & Cookies)
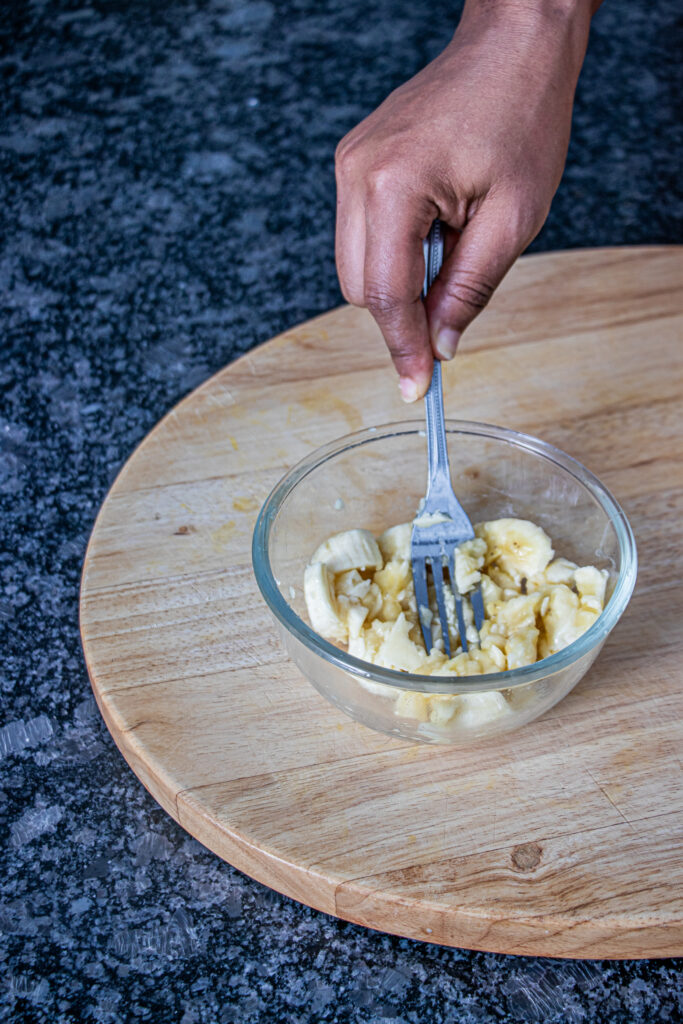
- Peel one banana and remove any excess string. Add it to a small bowl and use a fork to mash it until creamy with small lumps. Set aside to ready to use.
- In a small bowl, whisk together ½ cup of the evaporated milk with the cornstarch until combined and set aside.
- Add 10 vanilla wafer cookies to a plastic storage bag and pound to create rough crumbles.
Warm The Milk
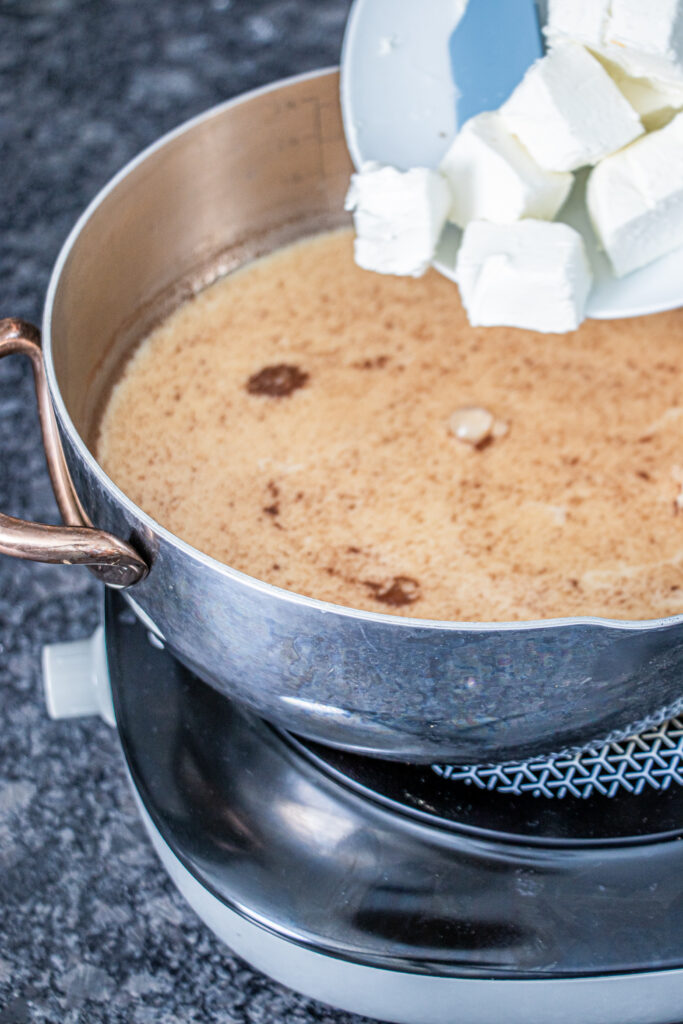
- In a medium saucepan, whisk together remaining 2 ½ cups of evaporated milk, sugar, salt, and cinnamon until combined. Place mixture over medium heat and when warm, add cream cheese and whisk constantly until cream cheese is melted and sugar is dissolved, about 4 minutes. SIMMER BUT DO NOT BRING TO A BOWL. Once cream cheese is melted, temporarily remove the mixture from the heat.
Temper The Eggs
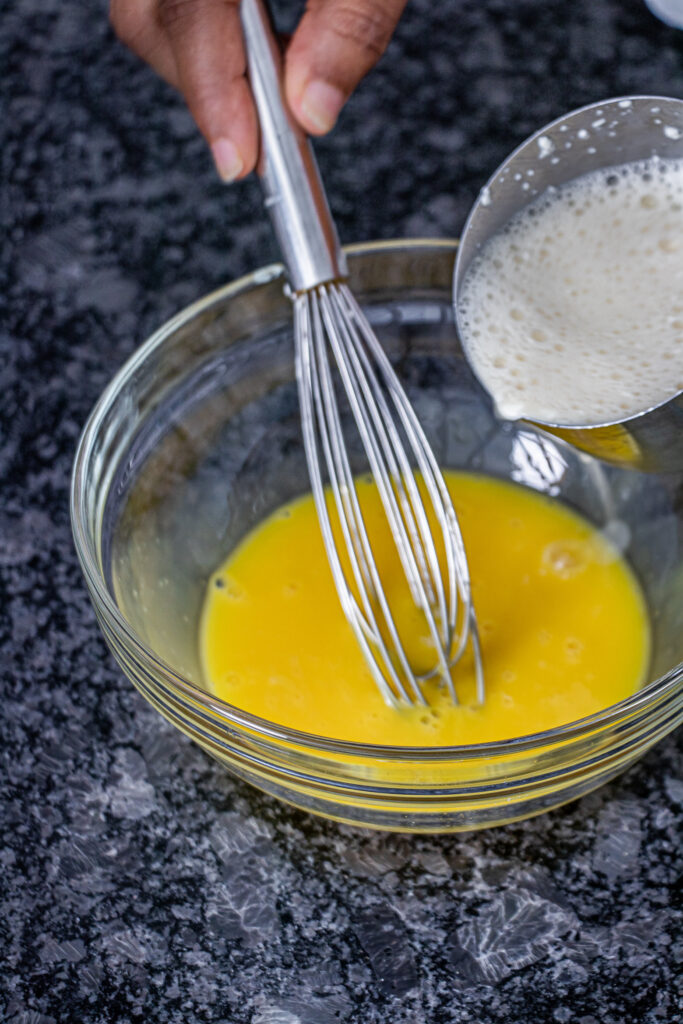
- In a separate small bowl, whisk the egg yolks. Once the milk is off the heat, slowly whisk in ½ cup of the warm milk into the egg yolks until combined.
Prepare The Custard
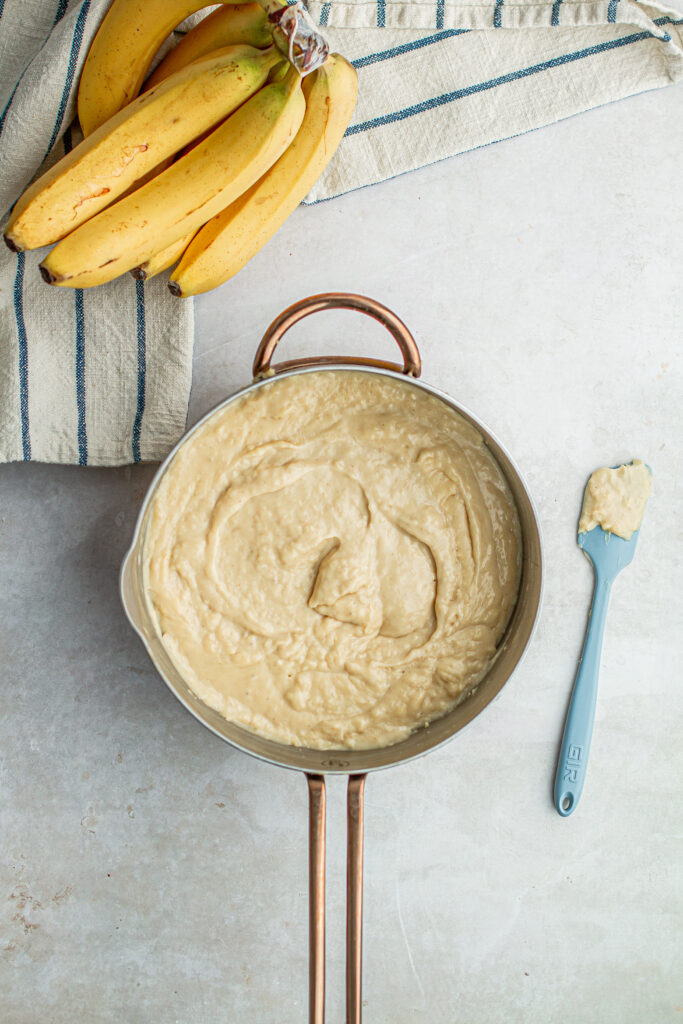
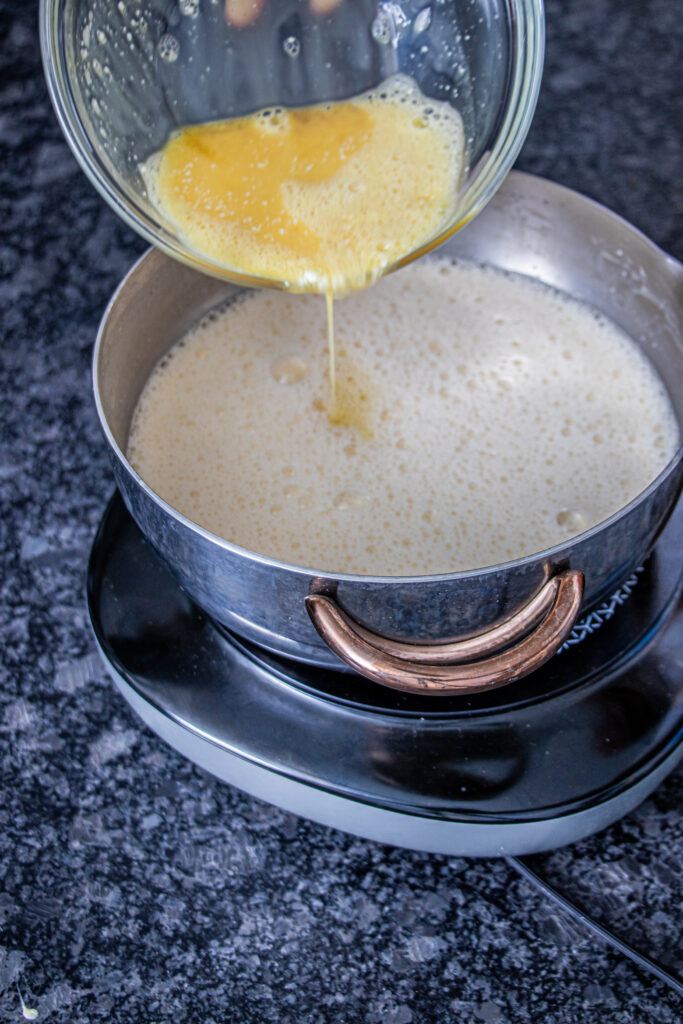
- Slowly stream the egg & milk mixture back to the saucepan with the warm milk. Also whisk in the cornstarch slurry and mashed banana mixtures. Return the saucepan to medium heat and bring to a simmer, whisking constantly to prevent burning, until the mixture thickens about 8-10 minutes. The mixture is done when you start to see the large bubbles pop as a result of the moisture evaporating.
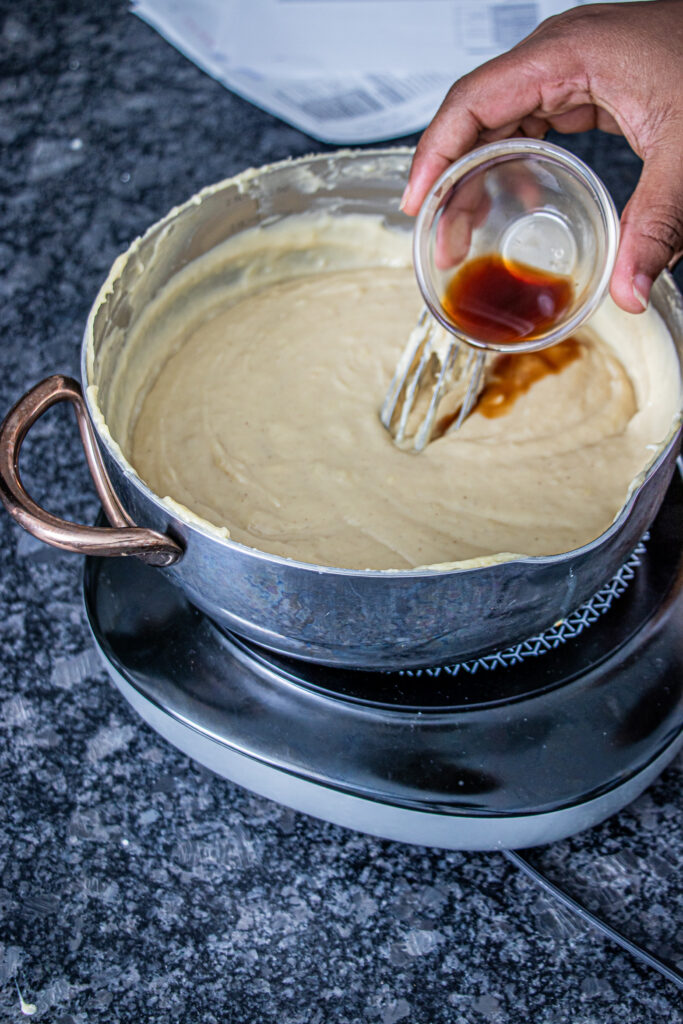
- Remove the saucepan from heat and stir in vanilla extract and butter until the butter has melted and the pudding is glossy. [Optional] For extra smooth texture, strain pudding through a sieve into a bowl to remove any small lumps.
For Fast Cooling
- Make an ice bath by filling a large bowl or stock pot halfway with ice water. Transfer pudding to a large bowl. Carefully stabilize the bowl inside of the ice bath for 10 minutes, stirring occasionally until the pudding reaches room temperature. Be careful not to get any water into the saucepan with the pudding
Regular Cooling & Refrigeration
- If not fast cooling, allow the pudding to rest to get to room temperature. You can either begin layering your banana pudding at room temperature or put it in the fridge to assemble the banana pudding later. If refrigerating, cover with plastic wrap, pressing it directly onto the surface of the pudding to prevent a skin from forming. Transfer bowl to the refrigerator for 4 hours minimum or overnight.
Prepare Whipped Cream
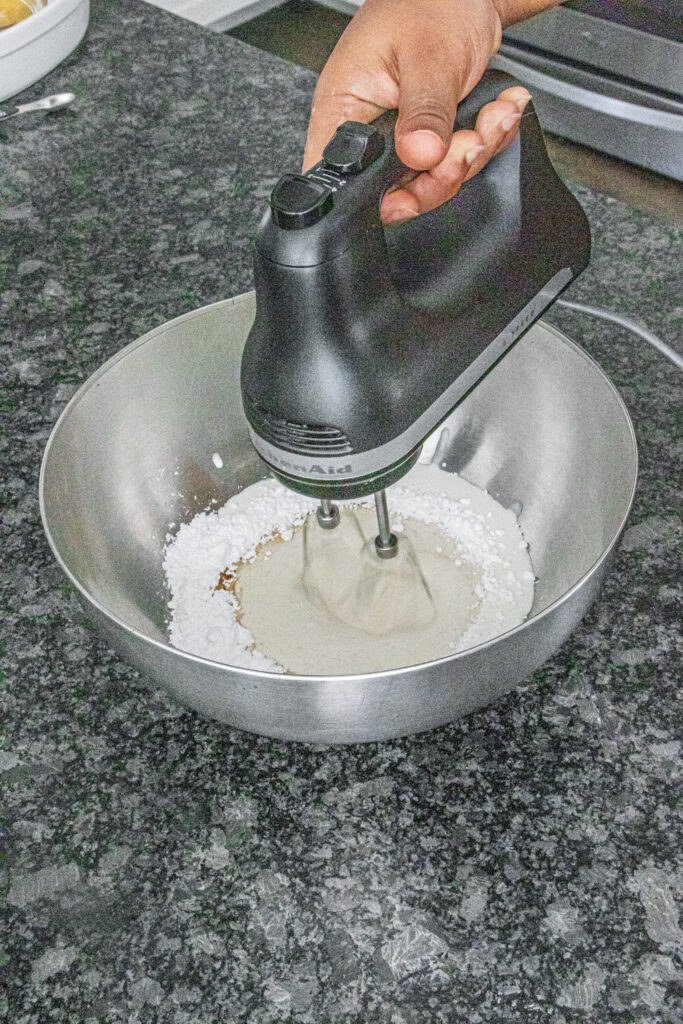
- In a large bowl add all the ingredients and mix for 2-3 minutes with a hand mixer until light and fluffy.
Assemble & Layer Banana Pudding
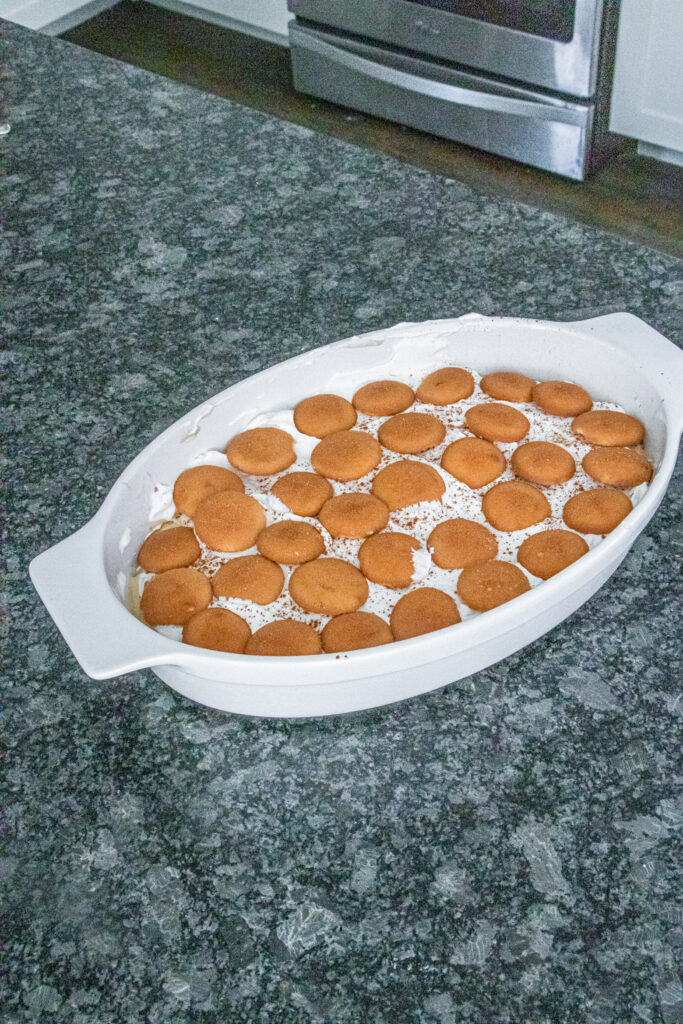
- Thinly slice the remaining 5 bananas. To the bottom of a 9×13 baking dish arrange a layer of vanilla wafer cookies in a single layer.
- Add a single layer of banana slices on top of the vanilla wafers.
- Spread half of the banana pudding mixture evenly over the top of the bananas.
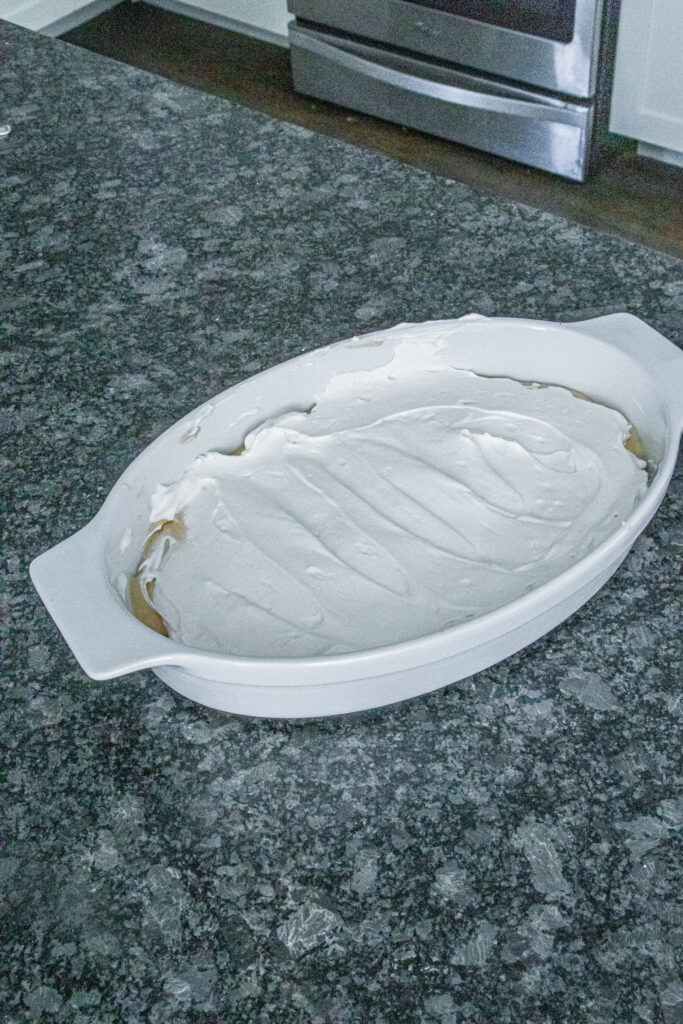
- Spread half of the whipped cream on top of the banana pudding.
- Sprinkle ground cinnamon on top of the whip cream.
- Repeat each layer 1 more time – when you get to the whip cream layer, pile it in the center to create height and don’t spread it all the way to the edges so that the banana pudding peaks through.
- times (you’ll have 2 layers of) ending with the whipped cream.
- Refrigerate until set, at least 4 hours before adding toppings.
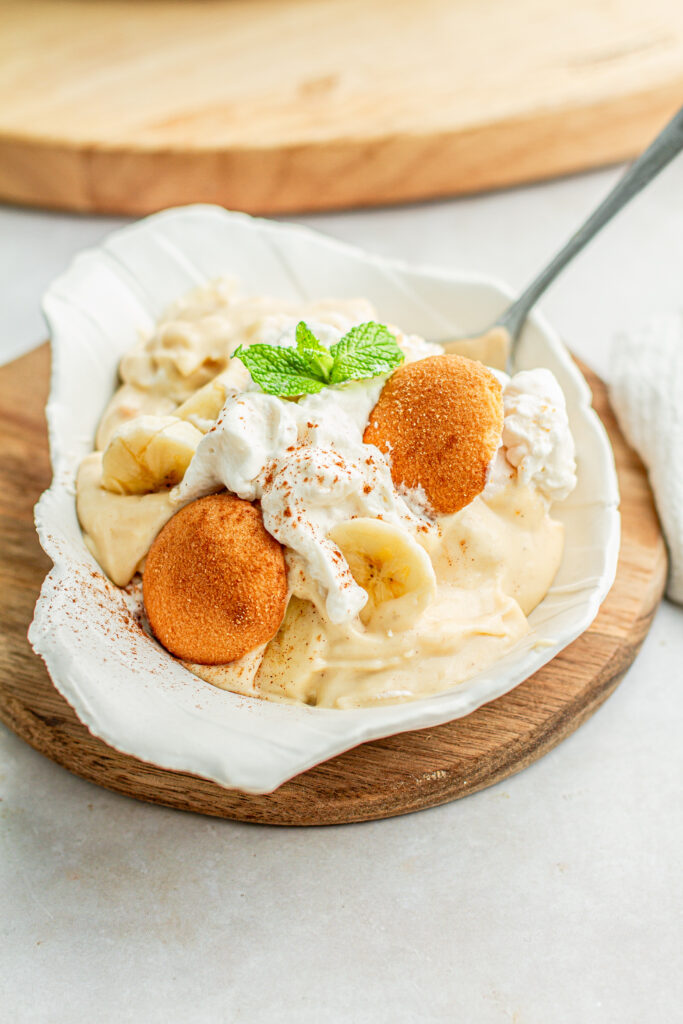
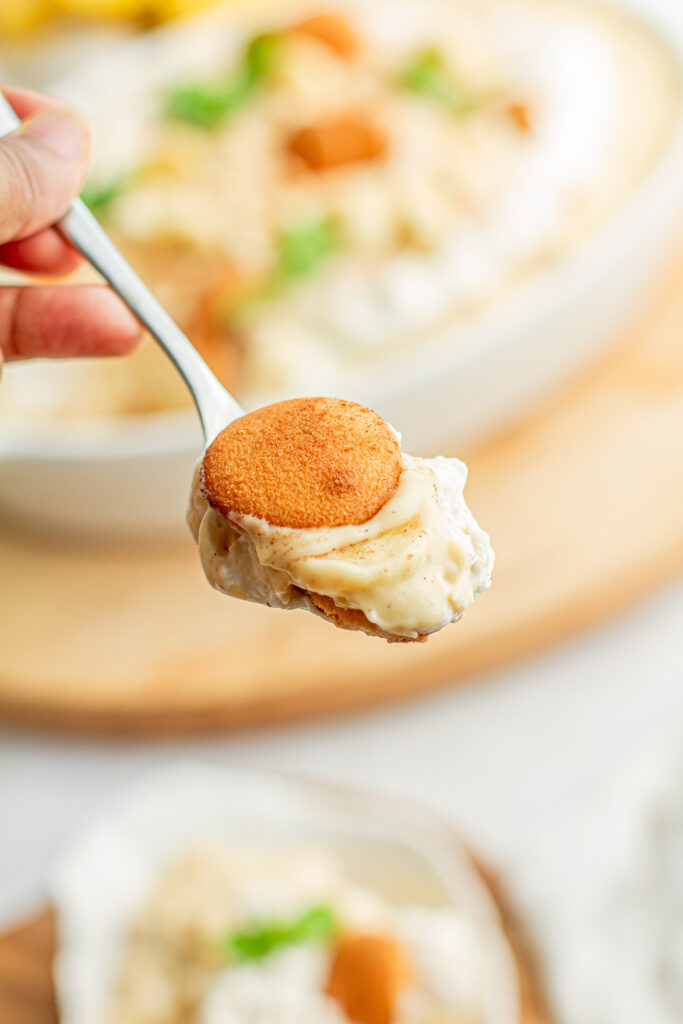
- Sprinkle cinnamon and crumbled cookies over the top. Garnish with any leftover cookies, sliced bananas and fresh mint to the top before serving.
Notes
- Bananas
- To prevent bananas from turning brown, lightly brush them with citrus juice, club soda or spritz with them with a spray bottle. Use as little juice as possible to avoid altering the flavor of the pudding. This will slow the process of oxidation preventing the banana slices from turning brown.
- For extra smooth texture, strain pudding through a sieve into a bowl to remove any small lumps.
- Wafers
- Nilla wafers are traditional and work great, but you can also use Chessman cookies, Golden Oreo Thins, graham crackers, shortbread cookies, biscoff cookies, or butter cookies for a different look and taste.
- For garnishing, add extra cookies and banana slices just before serving.
- Chilling and Serving
- For fast cooling, make an ice bath by filling a large bowl or stock pot halfway with ice water. Transfer pudding to a large bowl. Carefully stabilize the bowl inside of the ice bath for 10 minutes, stirring occasionally until the pudding reaches room temperature. Be careful not to get any water into the saucepan with the pudding.
- Allow the pudding to chill for at least 4 hours before serving. This gives the cookies time to soften and the layers to come together.
- Extra Tips
- You can chill the banana pudding for at least 1 hour before assembling to have an extra firm pudding that will be easier to layer. Trifle is all about the layers meaning it’s important that each layer remain visibly distinctive.
- Stir pudding constantly to prevent the bottom from scorching and to keep lumps from forming.
Nutrition
*Nutrition information is a rough estimate.
**The equipment section above contains affiliate links to products I use and love. As an Amazon Associate I earn from qualifying purchases.